- Crear usb booteable:
Take a deep breath and take your time- this is pretty simple, but it's easy to miss things if you rush. Follow each step to the letter.
1. Insert the USB drive
2. Open /Applications/Utilities/Disk Utility
3. Highlight the USB drive in left column
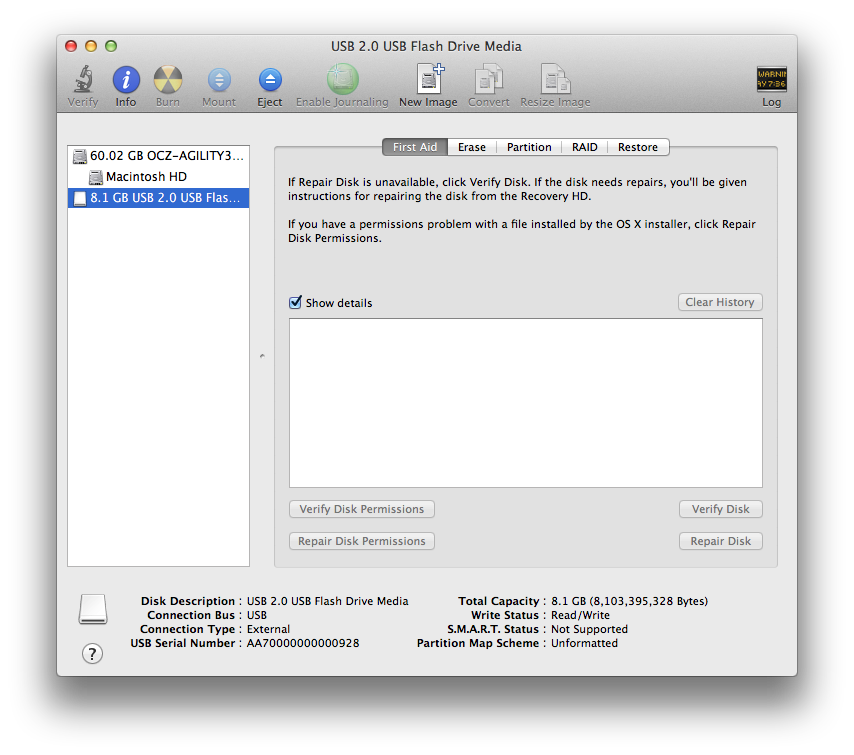
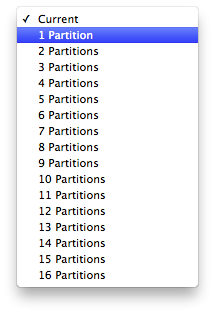
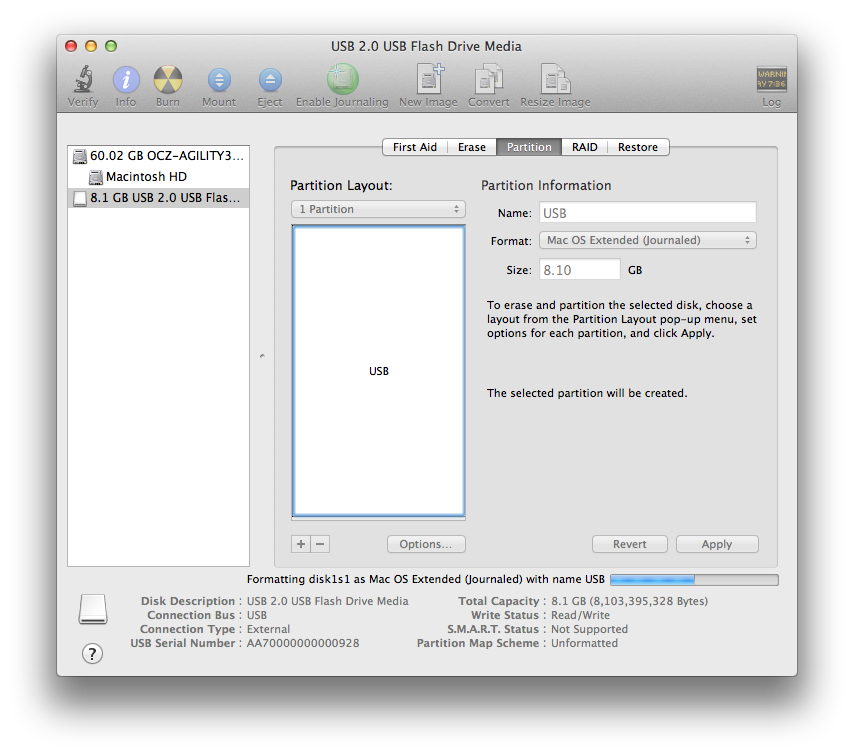
4. Click on the Partition tab5. Click Current and choose 1 Partition
6. Click Options...7. Choose Master Boot Record
8. Under Name: type USB (You can rename it later)9. Under Format: choose Mac OS Extended (Journaled)10. Click Apply then Partition
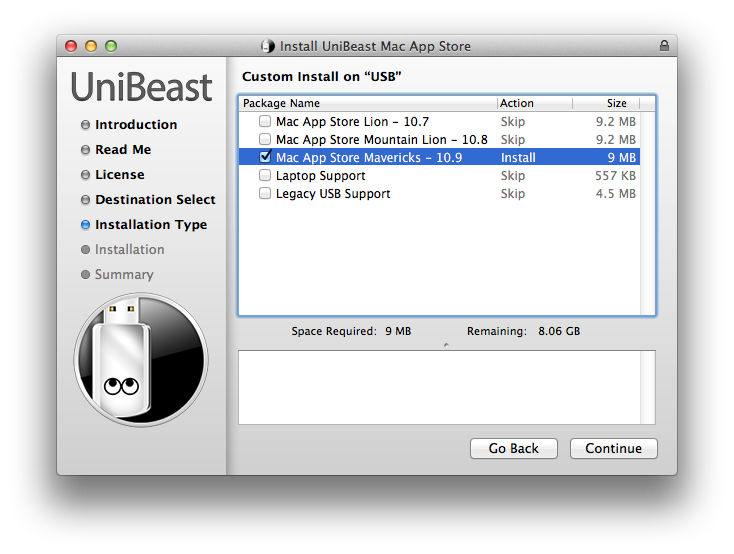
11. Download and run UniBeast12. Click Continue, Continue, Continue, Agree
13. At Destination Select, choose USB and click Continue
14. If using a Socket 1156 system without Rate Matching Hub (RMH) USB choose Legacy USB Support15. If using a laptop, choose Laptop Support16. Click Continue17. Enter password and click Install
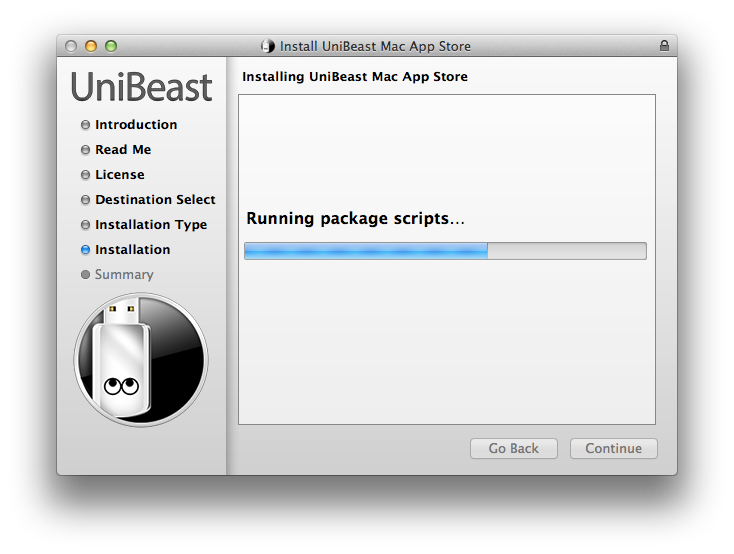
UniBeast will now create the bootable USB drive. The process will only take about 10-15 minutes, depending on system and drive speed, but will show hours. This is normal. Do not unplug or stop during this time.18. Drag MultiBeast to your completed USB drive.
Desconectar todo hardware menos lo elemental
PREPARANDO BIOS
Conecte la unidad USB que creó en el STEP 0.
If you're installing on a recommended CustoMac desktop with AMI UEFI, the options are simple. For other systems make sure to set your BIOS or UEFI to Optimized Defaults, and your hard drive to AHCI mode. Award BIOS settings are listed here.
1. Configure your BIOS as follows (taken from daemontus):
UEFI: Load Optimized Defaults
Disable VT-d
SATA mode = AHCI
Initial Display Output = IGFX
Set BootModeSelection = Legacy Only


STEP 4. Boot from USB DriveYou can either choose to 1. boot from the USB Drive in the Bios (under "Save & Exit" > "Boot Override" > "PX.....", where "PX...." = your USB thumb drive. If you followed mga1981's screenshots, it should be P0.) OR2. Save and Exit the BIOS and then press/hold F12 during reboot and select to boot from the USB Drive.STEP 5. CHIMERA SCREENWhen you boot from your USB drive you'll see the following screen:
Image from http://www.tonymacx86.com/374-unibea...-based-pc.htmlSTEP 6: BOOT INTO INSTALLER IN SAFE + VERBOSE MODEIn the screen above, press "-v -x" on your keyboard (without the quotation marks) and then Enter to boot into verbose and safe mode. This prevents any kernel panic for me.
Image from http://www.tonymacx86.com/374-unibea...-based-pc.htmlStork suggests the following if you still get a kernel panic: Reboot and, at the Chimera screen, press the keyboard's SpaceBar to open the boot flag window at the bottom of the screen; Enter "maxmem=4096" (without the quotes), where 4096 is your memory size div by two; and
STEP 7: INSTALL OSX AS PER THE OFFICIAL GUIDERefer to Guide Step 4.5.STEP 8: POST INSTALLATION SET UPAfter rebooting (restarting) your system in Step 7 above, you will still need to boot via USB because your OSX is not ready. Hence, press F12 to boot via USB again. You will see the screen below. Make sure you boot in safe and verbose mode! Type "-v -x" as you did previously.
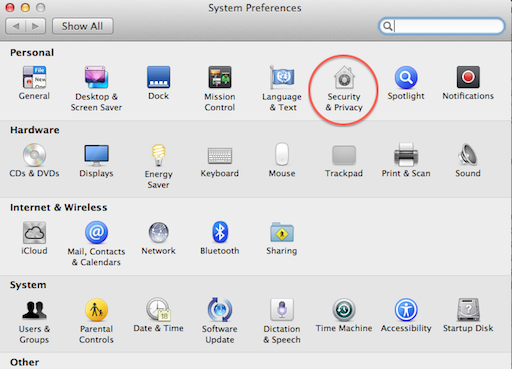
Image from http://www.tonymacx86.com/374-unibea...-based-pc.htmlSTEP 9: MULTI BEAST1. Install MultiBeast:Once you're in OSX, go to Finder and copy the Multibeast 6.5.0 (correct as of 27 Sep 2014) zip file to the "Applications" folder. 2. Changing System Preferences (taken from Stork's post)Before running MultiBeast for Mavericks, open the Security & Privacy Preference Pane in System Preferences, which is located in your Dock, and:
In the lower left corner, click on the padlock and type in your Admin username & password;
Click on the General tab if it isn't already highlighted;
Click on the "Anywhere" radio button under "Allow applications and downloaded from:" and
Close the System Preferences window.
3. Run MultiBeastThen, navigate to your "Applications" folder and double click on the zip file - this will extract the contents into the Applications folder. Open the "MultiBeast - Mavericks Edition" and double click "MultiBeast".
4. Install the necessary drivers (partly taken from Stork)- Quick Start -> DSDT Free
- Click "Drivers" and choose the following options: Drivers -> Audio -> Realtek ALC8xx > ALC892 Drivers -> Audio -> Intel 9 Series Motherboard Support Drivers -> Disk -> Intel Generic AHCI SATA Drivers -> Graphics -> Intel 9 Series HD 4600 Graphics Fix Drivers -> Disk -> Trim Enabler <--- Optional for SSDs (most SSDs will need it) Drivers -> Network -> Realtek -> AppleRTL8169Ethernet 2.0.6 (for H97M D3H)
Customize > System Definitions > iMac > iMac14 (",1" for i3/i5 processors and ",2" for i7)Note: toleda has suggested that we use the following:
iMac14,1 - HD4600 only, or
iMac14,2 - HD4600 and discrete graphics card or discrete graphics only
Note: Optional > Use a processor specific SSDT, independent of SysDef. See toleda's guidefor more information: Mavericks: Native CPU/IGPU Power Management Build <--- To see your full configuration
Click Save if you would like. Click "Install" at the bottom right corner and wait for it to complete.
STEP 10. RE-CONFIGURE YOUR BIOS (taken from Stork)- Reboot into the BIOS.- Change BIOS Features > Boot Options Priorities > set this to the P0 setting for the Mavericks drive- F10 to save the BIOS update and reboot.
And that's it!
Update:
Known issues:I am using a "windows" Logitech keyboard combo (MK520) and I encountered some problems when the dongle was plugged into the USB2.0 port. The mouse and keyboard would often loose connection and stopped responding. Turning it on/off sometimes help, but it was almost non-usable. Switching to a USB3.0 port rectified the problem.
Paso 1: Formatear Memoria
Insertar el USB vacío
Abrir Disk Utility (ubicado en Applications/Utilities/Disk Utility
Seleccionar al USB en la mano izquierda, y luego Partición. Click en “actual” (Current) y elegir 1 Partición. Como nombre le ponemos USB y como Formato, Mac OS Extended (Journaled)
Click en Opciones… y asegurarse que “Master Boot Record”, la última opción, sea la elegida.
Finalmente, click en Aplicar y luego Partition.
Paso 2: UniBeast
UniBeast es la aplicación que hace todo esto posible, y necesitarán una Mac (y estar registrados al foro de TonyMacx86) para poder descargarla. Pueden hacerlo
desde aquí
Cuando UniBeast nos pregunte el destino, elegimos el USB (al que le dimos de nombre USB)
Ahora, tendrán que elegir entre tres opciones:
- Si tienen al instalador de Lion en Applications, elijan la primera opción
- Si tienen el USB con Lion, elijan la segunda opción
- Si están instalando Lion en una laptop, asegúrense de activar también la tercera opción. Si es una desktop, no es necesario
Click en Continuar, y luego Install. Ojo: El proceso parece terminar rápido, pero se quedará en “Running Package Scripts” por buen rato. Es normal, y todo debería tardar 10-15 minutos. Así que es ideal dejar la PC de tal manera.
Paso 3: Preparando la PC
Antes que nada, deben poner la placa madre de la PC en modo AHCI. Esto usualmente se consigue presionando la tecla “Delete” (o Supr) cuando nuestra PC reinicia, y cambiando la opción de “SATA” a AHCI.
Tras habilitar AHCI, presionen la tecla correspondiente para elegir el dispositivo de carga (en placas Gigabyte, la tecla es F12) y luego elijan USB-HDD. Obviamente, tienen que haber insertado el USB creado en la Mac en la PC.
En la pantalla que les aparece de Chimera (el loader), elijan USB. Si se les presenta algún error en este momento, pueden probar estos comandos:
- AMD Radeon 6670 – escribir PCIRootUID=0
- Para tarjetas gráficas sin soporte – escribir GraphicsEnabler=No
- Boot in Single-user mode – escribir -s
- Boot in Verbose mode – escribir -v
- Safe mode – escribir -x
Paso 4: Lion!
Cuando se inicie el instalador, tendrán que formatear sus discos duros (que usaremos sólo para Lion, por eso es recomendable usar un disco duro nuevo). Esto se consigue:
En la barra superior, elegir Utilities, y luego abrir Disk Utility. Elegir el disco duro donde instalaremos Lion.Asegurarse de que sea el Disco Duro para Lion, y no donde teneoms Windows.
Elegir Partición, Current y elegir 1 Partición. En Opciones, asegurense que esté elegido GUID Partition Method.
De nombre, pueden ponerle Lion. Bajo Format, Mac OS Extended (Journaled). Click en Apply y luego Partition, y cerramos Disk Utility cuando termine.
Ahora simplemente elegimos “Lion” como destino para el instalador, y esperar a que reinicie.
Una vez que el sistema reinicie, presionan F12 para elegir USB-HDD de nuevo (bootear desde el USB Instalador que creamos). En Chimera, esta vez eligen Lion, ya que nuestro disco no es booteable todavía.


![[Success] Gigabyte GA-H97M-D3H + i5-4690 + Intel HD4600-screen-shot-2014-09-26-23.54.09.png](http://www.tonymacx86.com/attachments/user-builds/105466d1411746870-success-gigabyte-ga-h97m-d3h-i5-4690-intel-hd4600-screen-shot-2014-09-26-23.54.09.png "[Success] Gigabyte GA-H97M-D3H + i5-4690 + Intel HD4600-screen-shot-2014-09-26-23.54.09.png")
![[Success] Gigabyte GA-H97M-D3H + i5-4690 + Intel HD4600-vx.jpg](http://www.tonymacx86.com/attachments/user-builds/105468d1411747312-success-gigabyte-ga-h97m-d3h-i5-4690-intel-hd4600-vx.jpg "[Success] Gigabyte GA-H97M-D3H + i5-4690 + Intel HD4600-vx.jpg")
![[Success] Gigabyte GA-H97M-D3H + i5-4690 + Intel HD4600-screen-shot-2014-09-27-00.05.46.png](http://www.tonymacx86.com/attachments/user-builds/105470d1411747627-success-gigabyte-ga-h97m-d3h-i5-4690-intel-hd4600-screen-shot-2014-09-27-00.05.46.png "[Success] Gigabyte GA-H97M-D3H + i5-4690 + Intel HD4600-screen-shot-2014-09-27-00.05.46.png")

![[Success] Gigabyte GA-H97M-D3H + i5-4690 + Intel HD4600-screen-shot-2014-09-26-9.37.02-am.png](http://www.tonymacx86.com/attachments/user-builds/105481d1411749544-success-gigabyte-ga-h97m-d3h-i5-4690-intel-hd4600-screen-shot-2014-09-26-9.37.02-am.png "[Success] Gigabyte GA-H97M-D3H + i5-4690 + Intel HD4600-screen-shot-2014-09-26-9.37.02-am.png")
![[Success] Gigabyte GA-H97M-D3H + i5-4690 + Intel HD4600-screen-shot-2014-09-27-00.14.09.png](http://www.tonymacx86.com/attachments/user-builds/105477d1411748340-success-gigabyte-ga-h97m-d3h-i5-4690-intel-hd4600-screen-shot-2014-09-27-00.14.09.png "[Success] Gigabyte GA-H97M-D3H + i5-4690 + Intel HD4600-screen-shot-2014-09-27-00.14.09.png")
![[Success] Gigabyte GA-H97M-D3H + i5-4690 + Intel HD4600-screen-shot-2014-09-27-00.21.22.png](http://www.tonymacx86.com/attachments/user-builds/105479d1411748594-success-gigabyte-ga-h97m-d3h-i5-4690-intel-hd4600-screen-shot-2014-09-27-00.21.22.png "[Success] Gigabyte GA-H97M-D3H + i5-4690 + Intel HD4600-screen-shot-2014-09-27-00.21.22.png")
![[Success] Gigabyte GA-H97M-D3H + i5-4690 + Intel HD4600-screen-shot-2014-09-26-9.36.14-am.png](http://www.tonymacx86.com/attachments/user-builds/105480d1411749537-success-gigabyte-ga-h97m-d3h-i5-4690-intel-hd4600-screen-shot-2014-09-26-9.36.14-am.png "[Success] Gigabyte GA-H97M-D3H + i5-4690 + Intel HD4600-screen-shot-2014-09-26-9.36.14-am.png")


